Lot of people
want to require their pen drive in safe and hidden mode and we already know
that there is one option through which we can partition USB pen drives. They
show up as a removable drive on the PC. In order to do so, we need to trick the
operating system into recognizing the USB pen drive as a fixed hard drive. To
do this, we will need to create your own set of drivers. In this workshop, we
shall demonstrate just that. Doing so, we can create multiple partitions and
store your private data on it. Only the first partition will be visible, and
the other partitions will not show up on any other PC, but your own.
 This way, you can
store your personal data away from your friends and family, and also we can
avoid viruses affecting this data when plugged in on another computer. To do
this, all you need is a simple universal USB pen drive driver, which can be
downloaded from Media fire. Download the archive, uncompressed it to a folder
on your desktop and get started. Don’t forget to backup the contents of your
pen drive, as it will format it.
This way, you can
store your personal data away from your friends and family, and also we can
avoid viruses affecting this data when plugged in on another computer. To do
this, all you need is a simple universal USB pen drive driver, which can be
downloaded from Media fire. Download the archive, uncompressed it to a folder
on your desktop and get started. Don’t forget to backup the contents of your
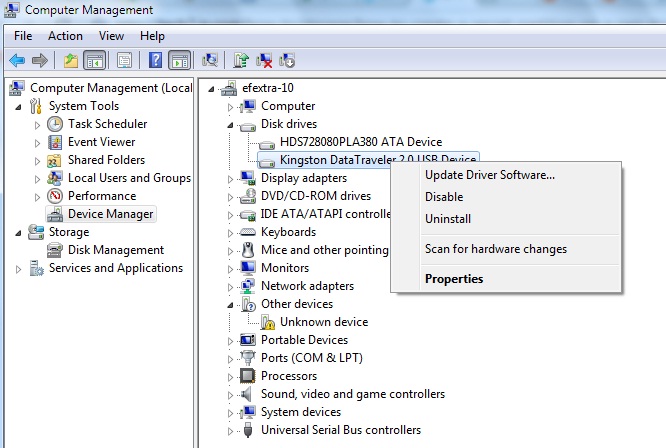
pen drive, as it will format it.Step 1: Plug in your pen drive into your PC’s USB port. Next, right-click on ‘My Computer’ and click on ‘Manage’ in the context menu. Click on ‘Device Manager’ on the left pane. This will show all the hardware devices connected to your PC. Now, on the right pane, scroll down to ‘Disk Drives’ and you should see your pen drive connected here. Right-click on the pen drive and select ‘Properties’.
 Step
2: In the properties window that
just opened, click on the ‘Details’ tab. From the scroll down menu under
‘Property’, choose ‘Device Instance Path’. You should see a string of
characters highlighted in the ‘Value’ window below, which should read something
like ‘USBSTORDISK&VEN_&PROD…..’ Right-click on this value and select
‘Copy’. Now close all the windows without saving changes.
Step
3: Now open the folder that you
uncompressed after downloading the universal USB flash drive driver. In this
folder, find and open the file named ‘cfadisk.inf’ in ‘Notepad’ or any test
editor you prefer (Notepad++ is ideal to be used here’ (download from
‘notepad-plus-plus.org’).

Step
4: Now locate the words
‘device_instance_id_goes_here’, which is available on line 26. You need to
replace these words with the string you just copied to the clipboard from the
Device Manager. Save the file and close the editor.


0 comments:
Post a Comment