Thursday, March 29, 2012

Programming Languages with your website.


When you make a website there are various different programming languages that you might encounter. Granted if you run a business then there is a good chance that it won’t be you at all who is making the site, and it may instead be a web design company. However in this case it is still useful to have a good grasp of what the various kinds of code are when programming a page, and of what they are each capable of. This way you can better understand the jargon that your web developers use, and can make more realistic requests regarding your site.

Here there are few of some languages that web development utilizes, to give you something of a crash course.

HTML: This is the most basic form of ‘programming’ for websites and isn’t really programming at all in the traditional sense as there is little input/output involved. HTML instead is used as a code for browsers to know how to display the code, text and images, and to this end it is more a matter of things like ‘next line’ or ‘link’.

CSS: CSS is a slightly more dynamic way of laying out your sites. This allows you to make elegant tables and to have nice rounded boxes places anywhere around your site which in turn is practically necessary for modern web design. At the same time because there is normally one ‘style.css’ file which all other pages refer to, this means that the whole site can be changed by altering a few lines rather than changing every page individually.

JavaScript: JavaScript is a pared down version of Java which in turn is similar to C. In other words then this is a ‘proper’ programming language with logic statements which allows you to do much more complex things like Math, Quizzes, Mail forms and more. To run JavaScript a visitor has to have the Java plugin installed on their device, but the vast majority of computers, phones and tablets will have this installed these days so it’s relatively safe for you to use.

PHP: PHP is a unique programming language in that it operates ‘sever side’. What this means is that it doesn’t actually get handled by your computer, but instead is handled by the server and you just see the output. This gives it advantages and disadvantages. The disadvantage is that things can only take place when the page loads, because once the page has loaded you only get the output and the server will have ‘sent’ that to our computer. You can get around this though by using cookies and reloading pages etc, or by combining it with JavaScript. The advantage however is that all devices the world over will see the code the same because it’s up to your servers how the code is handled – not the devices viewing them.

At the same time PHP also has access to all the files on your server and this means that it can be used in order to edit those, delete them and make new ones. This is what allows someone to upload a profile for instance, or allows you to edit pages through a UI that you or your web designer created.

Click To Play Plugin Feature in Firefox 14.


Click To Play is a feature that was first integrated into the Opera web browser, before it also became available in Google Chrome. The feature in Opera allows you to enable plugins on demand. When active, certain plugins are not loaded automatically when you visit a page that is trying to interact with the plugins. Instead, you see a big play button that you can click on to start the element on the page that is requesting access to the plugin.

Google Chrome
handles click to play in the same way. If you activate the feature, you see a placeholder on the page that you need to click on to allow the contents to use the plugin it requires for its functionality.

Click to play configuration

Opera: Opera button > Settings > Preferences > Advanced > Content > Enable plug-ins only on demand
GoogleChrome:  Wrench icon > Options > Under The Hood > Content Settings button > Click to play under Plug-ins

Firefox click to play

The latest Nightly Build of the Firefox browser includes a click to play feature of its own. It is currently only available as an about:config parameter, and not integrated into the user interface. If you want to enable it, you need to enter about:config into the browser’s address bar to load the configuration page. Filter for the parameter plugins.click_to_play and double-click it to change its Boolean value from false to true. This activates the new feature in the browser.
Once you have done that you will see a placeholder image whenever an element requires a browser plugin to function properly on a web page.

Tuesday, March 27, 2012

Some Kick Torrent Search Engines for Hunting Torrents..

We always used Torrents to download anything from internet in any cases. It’s well one of the quickest way to transfer and share files from one system to another. In recent years we have seen a major boom in P2P (peer-to-peer) file sharing technology.
Although downloading torrents from thousands of sites is not a difficult task, still people are unaware of how to upload a torrent file on a site. As huge volume of torrents found over the Internet, searching the right torrent that suites you is not an easy task as such because lot of them are fakes or chargeable.

Many times people ask – Which is the best torrent search engine on the web? I find it very difficult to answer, as people have different likings and dis-likings about search engines. But in downloading party we should keep this preference in mind, I have compiled a list of 30 Torrent search engines that would suit all sorts of people. Let me know, if you like it!
Top 30 Torrent Search Engines
1. Isohunt
11. Bitsoup
12. Torrentz
19. FullDLS
24. Fenopy
25. Usniff
26. Gpirate
29. ShareTV
31. ActiveDots by  Saboom
32. Torrentech by Raziel
33. LegalTorrents by Cristian
34. Toorgle by Eazy
35. SeekTorrents by Damien
36. TorrentZEN by Fred
37. coda.fm by denethor101 
38. IPtorrents by PVTSICK

Can Internet, social media be harmful to children's mental health?


Lets we can easily view the present trend to spread of social networking at the internet era.Can the Internet and social media be harmful to children's mental health?  Australian psychiatrists believe this may be the case.

The Royal Australian and New Zealand College of Psychiatrists (RANZCP) reportedly released a position statement assessing the positive and negative impacts of medium usage across youths.

“There are particular concerns regarding the impact of media on children and young people with identified mental health difficulties, but all children are potentially vulnerable,” RANZCP president Dr. Maria Tomasic is quoted as having said.

She added that families and people working with children need to be aware of the range of issues that media impacts upon, to provide optimal advice, support and care.

Dubbed "The impact of media on vulnerable children and adolescents," the position statement assesses both positive and negative impacts of medium usage across youthful audiences.

RANZCP Chair Dr. Nick Kowalenko said social media sites provide young people with opportunities to stay connected with friends, family and the world, and develop technical, creative and social skills.

He added there are health benefits from the media with the Internet providing information about health problems of relevance to young people such as stress, anxiety, depression and physical disorders.

For more Read :--- GMANETWORK 

How to save Gmail messages in Google Docs?


Lot of times we are not able some e-mail messages are quickly trashed; some are better off archived, but a few need work. Gmail has a new experimental feature that lets users save their messages as Google Docs.Gmail makes it much simpler to save your messages as documents and PDFs, keeping formatting intact.
Here's how to do it :-
  1. Log in to Gmail.
  2. Click the gear-shaped icon near the top right, then select Settings.
  3. Click the Labs tab near the top center.
  4. Scroll down and click Enable next to Create a Document.
  5. Scroll to the top or bottom and click the button labeled Save Changes.
  6. The next time you want to save a message as a doc, just click the More button in the top center of the message reading pane, then select Create a document.
  7. A new tab opens in Google Docs. From here, it's easy to edit, save, and export as a PDF or some other file format.
  8. That's it! This feature is incredibly handy for tackling invites, e-mailed schedules, and all sorts of other problems that cutting and pasting just can't solve.

Friday, March 23, 2012

How to get indexed earlier by Google ?

Every user or content writer want to make life immediately on search engines but that will possible after some useful knowledge of SEO.If you’re not familiar with how some people accomplish getting their web sites submitted to Google quickly, you are going to absolutely prefer this article.
 

You have heard from lot of people that it can take days, weeks, even months to get indexed by Google or other search engines.If I read this blog title a while ago, I’m sure I would be thinking the same thing as you. Ok, let’s move on to how to get indexed by Google within one hour.
The secret is quite simple. Almost every site in today’s Internet world uses the social network sharing buttons. On my blog, http://www.techapple.org  I include it on every article page. I also include it on the main listing pages underneath my article summary.
If you don’t already have one of these on your sites, get one now, just search “Share This” or “Add This” and you will find a ton of web sites that tell you to put a few lines of Javascript code on your web site and it does the rest.

Ok, so now you have this button added to your web site? Perfect, I would suggest going to a page on your web site that you think will be the most valuable to other users and submit it to a couple of those sites listed in the button.
I have personally found excellent success with both Digg and Reddit. I launched a web site about 3 or 4 months ago, submitted two links to Digg. I waited about an hour or so and searched Google with keywords that I felt I targeted well and lo and behold there it was, my page was found and indexed with Google. Not only was it found, it was in the top 10!
Don’t just stop here though. Submitting to the above sites will provide you with some quick traffic. It won’t last long if people don’t like your site. Plus, it won’t cause your other pages to be indexed either. It really is just a start.
The next step is to create an XML sitemap of your content. Once you’ve done this, create an account on the Google Webmaster Tools. You will need to add your domain and verify your site before continuing.
Once you’ve completed this, add your sitemap that you previously created. Within a few minutes (some times longer), Google will validate your sitemap and queue all of your links to be indexed.
This of course is not a guaranteed solution to be indexed any faster. But Google certainly seems to crawl your sitemap on a regular basis and check the links. It also checks how often your site is updated, the more frequently it is updated, the more frequently Google will crawl your content!
If it’s possible, you should try to perform some kind of daily updates to your site. Ideally if you allow users to comment, hopefully there will be several new comments per day and this will cause your data to be considered new.

Thursday, March 22, 2012

How to check an email address actually exists or not ?

We know Internet is now ruled by a different kind of communication, we still use to reply on email for several reasons and yes it is also one of the most convenient way to transfer the information. But email address is not easy like Twitter and Facebook to authenticate; but other instance we can’t confirm whether it is genuine or fake easily. I got some useful tools to check whether an email addresses actually exits or not, you can see them below. Tool I tried is Verify Email Address and it is quite awesome. This will be really useful for newbies.

  1. Email Address Verified This means the email address is correct. They checked the email address syntax and also whether the mail server is working properly or not.
  2.  Email Address Is Not Valid Here the information says the email address “……@example.com” was not created by the administrator, but has a mail server configured using Google Apps and the email syntax is correct. So the email address is not valid or available.
  3. No MX Resource Records are Found MX (Mail exchange) Record is an entry in a domain name database that identifies the mail server that is responsible for handling e-mails for that domain name. Here the MX Resource Records are not found, so probably they might not have configured any mail server for sending and receiving mails. So any email address with “____@example.com” may not be valid.
   4. Invalid Email Address Syntax Normally an email address will look like “name@example.com”, but the one mentioned here is not, so obviously it is an invalid email address.
What Really Happens Behind? These screenshots gave simple explanation, what really happens is quite Geeky; you can check the process below.
Log:
Get MX for gmail.com... OK.
Connect to gmail-smtp-in.l.google.com... OK
= 220 mx.google.com ESMTP h5si1627720qcd.7
> EHLO email-verifier.net
= 250-mx.google.com at your service, [209.160.72.213]
250-SIZE 35882577
250-8BITMIME
250-STARTTLS
250 ENHANCEDSTATUSCODES
> MAIL FROM: <info@email-verifier.net>
= 250 2.1.0 OK h5si1627720qcd.7
> RCPT TO: <............@example.com>
= 250 2.1.5 OK h5si1627720qcd.7
> QUIT

Geeky? Simple Explanation Here.
1. First they get MX DNS records of the domain name to verify which mail server are used.
2. Then they check the mail server to see whether the username really exists.
3. After verifying with the email syntax and all, the results displayed.
That’s it, no big issues. Meanwhile you can also check out similar tools like Verify Email Tool and Verify Email.

Wednesday, March 21, 2012

How to add Amazon in your Blogspot ?

Amazon Associates is appropriate non-technical way for you to make money off of your Blogspot blog.If you want to earn money by using Amazon then you can search for a product you want to post and copy and paste the appropriate code, you can add Amazon products to your blog, and perhaps make a little money from your blog. To do this, you need to register for an Amazon Associates account, which can take a day or two for Amazon to review your site. Once when you will get approval, you can start posting products to your Blog.

Steps to Add Amazon :-
  1. Go to the AmazonAssociates on Blogger page.
  2. Click "Get Started Now" to go to your blog's login page.
  3. Enter your "Email" and "Password" if requested.
  4. Click "Sign In" to go to your blog's control page.
  5. Select whether you want to create an Associates ID or use your existing Associates ID. If you use your existing Associates ID, you need enter your "Amazon AssociatesID."
  6. Click "Set Up Amazon Associates." If you chose to create a new ID, fill out the required fields, and click "Next" to go to the Website Profile page.
  7. Fill out the required fields, and click "Next" to return to your Blogger page.
  8. Check your email for a message from Amazon admitting you to the program.
  9. Enter your "Associates ID" to log into the Amazon Associates page.
  10. Select the type of link or banner you want to add to your site.
  11. Enter the product you want to add in the "Search" fields. Click "Go!" to search. You will be taken to a results page.
  12. Locate the item you want, and click the "Get Link" button below the item to go to the item's Customize and Get HTML page.
  13. Highlight the HTML code at the bottom of the page, and copy it.
  14. Go back to your blog page.
  15. Insert the code where you want it to appear on the page.
  16. Click "Save."

Monday, March 19, 2012

How to create secret partition on a pen drive?


Lot of people want to require their pen drive in safe and hidden mode and we already know that there is one option through which we can partition USB pen drives. They show up as a removable drive on the PC. In order to do so, we need to trick the operating system into recognizing the USB pen drive as a fixed hard drive. To do this, we will need to create your own set of drivers. In this workshop, we shall demonstrate just that. Doing so, we can create multiple partitions and store your private data on it. Only the first partition will be visible, and the other partitions will not show up on any other PC, but your own.
This way, you can store your personal data away from your friends and family, and also we can avoid viruses affecting this data when plugged in on another computer. To do this, all you need is a simple universal USB pen drive driver, which can be downloaded from Media fire. Download the archive, uncompressed it to a folder on your desktop and get started. Don’t forget to backup the contents of your pen drive, as it will format it.

Step 1
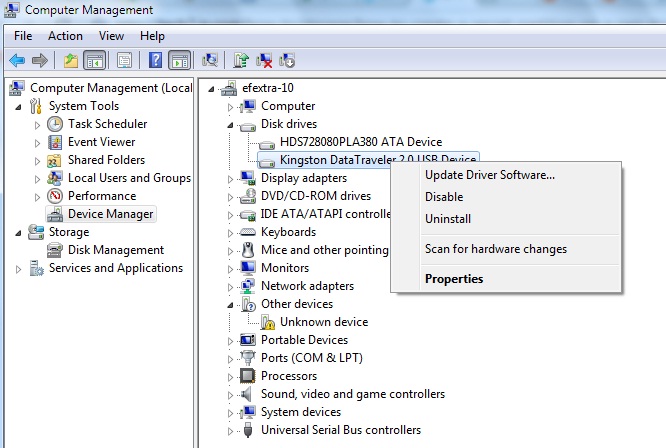
: Plug in your pen drive into your PC’s USB port. Next, right-click on ‘My Computer’ and click on ‘Manage’ in the context menu. Click on ‘Device Manager’ on the left pane. This will show all the hardware devices connected to your PC. Now, on the right pane, scroll down to ‘Disk Drives’ and you should see your pen drive connected here. Right-click on the pen drive and select ‘Properties’.
Step 2: In the properties window that just opened, click on the ‘Details’ tab. From the scroll down menu under ‘Property’, choose ‘Device Instance Path’. You should see a string of characters highlighted in the ‘Value’ window below, which should read something like ‘USBSTORDISK&VEN_&PROD…..’ Right-click on this value and select ‘Copy’. Now close all the windows without saving changes.
 Step 3: Now open the folder that you uncompressed after downloading the universal USB flash drive driver. In this folder, find and open the file named ‘cfadisk.inf’ in ‘Notepad’ or any test editor you prefer (Notepad++ is ideal to be used here’ (download from ‘notepad-plus-plus.org’). 
Step 4: Now locate the words ‘device_instance_id_goes_here’, which is available on line 26. You need to replace these words with the string you just copied to the clipboard from the Device Manager. Save the file and close the editor.

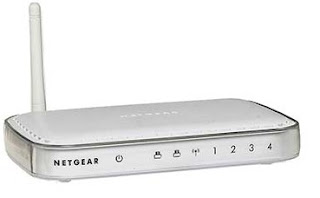
How to configure Netgear Wireless Router ?


Netgear wireless router being one of the most popular wireless networking devices allows you to interconnect your computers, laptops, peripheral devices, and non-computer devices etc. It means you can share media files or documents, do live streaming, browse internet, send/receive emails, or print documents etc. simultaneously. Easy it sounds, but highly cumbersome the procedure is for setting up a Netgear wireless router.
Therefore, we have decided to help you out by bringing this comprehensive and easy-to-understand guide to you. The purpose of this guide is to provide you step-by-step information on Netgear router setup support in the most user-friendly way and save you from doing rounds of vendor's shop and exploring different websites for right Netgear technical support and spending a great deal of time.
Netgear Wireless router package ideally contains:
·         A wireless router
·         A blue Ethernet cable
·         A power adapter (varies region-wise)
·         A resource (installation) compact disc (CD) including the Smart Wizard Installation Assistant and the manual
·         Warranty card
·         Support information card

Methods of Netgear Wireless Router Setup:
1.       Smart Wizard Installation Assistant Setup
2.       Manual Setup
What is required before you start?
·         An active internet connection
·         Configuration information, provided by your ISP (internet service provider) when you subscribed to their service. You may require one or more than one of the below mentioned information for your Netgear router setup:
Host & domain names
Domain name server (DNS) addresses
Fixed or static IP addresses
Internet login user name and password (could be an email address & password)
A)     Smart Wizard Installation Assistant Setup Method
1.       Insert the 'resource CD' into your PC and wait for the response. The CD will start itself automatically and recognize your PC's language viz. English or French etc. click on 'yes' or 'ok' to continue in the same language or change it if you want to.
2.       Click on 'next' to proceed
3.       Click on 'setup' to launch the Smart Installation Assistant
4.       Follow rest of the instructions and the wizard would check your internet connection, configure wireless network settings, and choose the optimum security level for your network.
B)   Manual Setup Method
Below are the easy steps that will help you access Netgear router setup:
·         Open up your browser viz. Internet Explorer, Mozilla Firefox, or Google Chrome etc., whichever you are using
·         Type 192.168.0.1 or 192.168.1.1 in the address bar of your browser and then hit 'enter' on the keyboard or 'go' tab on the browser. You will see a login screen, which will prompt you to enter your login information viz. username and password.
·         Enter your user name and password in the window. If it's a new router, then the login information would the default one came along with the router. Or, if it's a router you have been using previously, then the information would be the configuration information that you entered while setting it up for the first time.
·         After logging in, you will see a setup utility window
·         Once you have setup your router, you can use it for wireless networking.

Saturday, March 17, 2012

How to remove an email Address in Gmail ?

All people use have an unique identity either Gmail or other, but in Gmail remembers two different types of addresses. First  and most obvious, are your contacts--the people, companies, and organizations that you have intentionally added to your address book. The other addresses are those that you've sent email to but never entered as a contact.


But it can also be a problem. You start typing in a friend's name and up come two addresses--the one from your contact list and a dead one you haven't intentionally used in years. And you pick the wrong one.
So how do you delete a contact that isn't really one of your contacts? By pretending that you're about to turn it into one:
Click Gmail in the upper-left corner of the Gmail Web page, then Contacts from the pull-down menu.
Start typing the name or address in the search field. When the unwanted address appears, select it.
This will bring up the page where you can turn this person into a real contact. You can add or change the name, address, a birthday, and even a photo.
But that's not what you're here for. Instead, pull down the More menu near the top of the window and select Delete contact.
It's possible that if you start typing the name into a message's To field immediately, it will still come up. But if you wait a couple of minutes, it won't. And it won't ever again.
There is one variant to this: When you select the name, you might find that the unwanted address is one of several for a real contact whom you want to keep. You just want to get rid of that particular address.
In that case, don't select Delete Contact. Just click inside the unwanted address field, press CTRL-a to select the entire address, then press DELETE.

Enable Administrator Account already built in Windows8.

Windows8 have hidden built-in administrator account. By default, this account is disabled. But if you have administrator access, turning it on is easy.
On the Metro Home screen, Type: lusrmgr.msc and press Enter. It’s a little strange at first, but that is how search works in the Metro UI. Just start typing and it automatically opens up.

Alternatively, if you’re on the desktop, you can press they Keyboard Shortcut Windows Key+ R on your keyboard to open the Run menu and type it in.

Lusrmgr (Local Users and Groups Manager Snap-in) comes up. Open the Users folder, then right click on Administrator and select Properties.

In the Administrator properties uncheck Account is Disabled. Click OK.

Done! The Windows8 Administrator is now enabled and you can immediately sign in with it by logging out or switching accounts.

Wednesday, March 14, 2012

Super Monkey Ball 2 available on Google Play Store.

I am very found of games to play, If there’s one game I’ve been waiting to play ever since I picked up my first Android smartphone, it’s Super Monkey Ball. This Kooky title is fun, addictive and so simple that dome kind of non-human simian could play it. Now Sega has seen fit to release Super Monkey Ball 2: Sakura Edition on the Google Play Store, and you’d be hard pressed to have more fun with a barrel full of baboon lemurs. It’s available today for just 99 cents, though that’s a promotional price that’s likely to increase soon.
This originally Super Monkey Ball was a launch title for the Nintendo GameCube way back in 2001. As one of Sega’s first original titles to debut on a competitor’s hardware, it surprised players with simple but challenging gameplay in the style of a classic marble puzzle. Despite appearances, players controlled the floor (not the monkeys in their gerbil balls) with the GameCube’s analog stick. Super Monkey Ball 2 has already been available for iOS for some time, and previous reports indicated that it was headed for an Xperia Play release, but happily, it’s available to one and all.
Basic gameplay makes for a fun time on smartphones and tablets, and there’s plenty of content here – 125 levels with a Far East theme, plus four mini-games. These include a bowling game, mini-golf, a sort of bare-bones flying game and the tablet-exclusive Monkey Base, sort of like the old classic Scorch. With Monkeys. In plastic balls. Trust us ,this one’s worth it.

Google celebrates 101st birthday with origami doodle of Akira Yoshizawa's.

Origami, the famous art of paper folding, was used for making traditional crafts for centuries until one man finally raised the art form into a living art. Japan's AkiraYoshizawa (born on March 14, 1911; died on March 14, 2005) is credited for making origami an international rage.
 Today Google celebrates what would have been Akira Yoshizawa's 101st birthday by posting a paper folding doodle on its homepage. Today's doodle features the six letters of Google logo, designed in origami style. The doodle also has paper butterflies, which are said to be folded from Yoshizawa's earliest but iconic designs. The innovative doodle was created with the help of Robert J. Lang, who is also a popular origamist.
The combination of simplicity and depth is part of the essence of origami, and is key to Yoshizawa's work and legacy,” says Lang, a 50-something former laser physicist who left behind NASA and Silicon Valley jobs to give full time to the art of origami.
Over the course of his life, Yoshizawa created thousands of origami works and pioneered many of the artistic techniques used by modern-day origami artists including the popular technique of wet-folding. Yoshizawa is also referred as the grandmaster of origami art. Yoshizawa served as a cultural ambassador of Japan for a number of years and was eventually conferred with Japan's Order of the Rising Sun honor in 1983.
If you’d like to try to create your own origami doodle at home, click here.

Tuesday, March 13, 2012

How to merge pdf files by Batch PDF Merger ?

Users want to staple documents in a single file either its on for online or offline. Staplers are prime examples of tools built for one distinct purpose and they do it well.
Batch PDF Merger is the equivalent of a stapler for PDF files. It merges PDFs very effectively, but it doesn’t do anything else. And it’s free for small batches, but it is payware for merge huge quantities.

Batch PDFMerger’s interface supports drag and drop, or you can load an entire folder of PDFs.Merging is simple. Just load the PDFs into the files window, adjust the order you want them to appear in, and click merge.
           
The split button doesn’t separate PDFs and save them as individual files to your hard drive.  Instead, it splits files within Batch PDF Merger and allows you to rearrange them. If you split multiple PDF’s at once you can even drag pages from one to another. Once done rearranging, press Merge to bring the split files back together.


 If you feels that is good to be use so please let us comment of your used result :-

Monday, March 12, 2012

Top free file Compressor/Archivers Tool for Windows/Linux.


Lot of people wants to compress files with a good compression ratio and with very good compression speed. You can easily find out hundreds of free tools, but if you want best ZIP or RAR archive tools compress text, images, audio, videos and other type of files then continue reading this top 3 file compression tools.
7-Zip is popular and free file archive utility with set of powerful feature set. It does the job quickly and
with out any trouble.You can use 7-Zip on any computer, including a computer in a commercial organization. You don’t need to register or pay for 7-Zip.
7-Zip supports packing and unpacking of 7Z, XZ, BZIP2,GZIP,TAR and WIM formats.
For ZIP and GZIP formats, 7-Zip provides a compression ratio that is 2-10 % better than the ratio provided by PKZip and WinZip
WinRAR is a powerful file compression and decompression tool. It can backup your data and reduce the size of email attachments, decompress RAR, ZIP and others files downloaded from Internet and create new archives in RAR and ZIP file format.


IZArc is one of the advanced file archiving tool. You can use IZArc to open 7-Zip, LIB, JAR, RAR,TAR,TZ , WAR and many more formats. It offers many advanced features, including repairing of broken archives, searching within archives, password protecting, emailing of archives and much more.
With IZArc you can open CD image files like ISO,BIN,CDI and NRG. It is also possible to convert such files from one type to another (BIN to ISO, NRG to ISO). IZArc is 100% virus free and it doesn’t contain any spyware or adware.

Sunday, March 11, 2012

Three Tips for Help with Firefox Problems.


Lot of people are regular user of the Firefox browser? Here there are three useful tips that might come in handy if you run into problems with the browser.
Start Firefox in Safe Mode
Sometimes you have a problem with Firefox crashing or misbehaving. This could be caused by an extension and there is a quick way to check if this is the source of a problem. Firefox can be started in what is known as “Safe Mode”. This is not the same as Windows safe mode but is a way to run Firefox without any extensions. In older versions of Firefox, Safe Mode was an option in the Start menu but for current versions you start Safe Mode by holding down the Shift key when you double-click the Firefox icon.
The dialog shown below will open. This dialog provides the option of making permanent changes in Firefox or continuing to a temporary Safe Mode. To go to Safe Mode without making any permanent changes, click the button “Continue in Safe Mode” (shown outlined in the figure below). Extensions will be temporarily disabled but plug-ins such as Flash will still be active.
You can also get to Safe Mode by opening the drop-down Firefox menu, placing your mouse pointer on Help and clicking “Restart with Add-ons Disabled”
More about using Safe Mode can be found at this Mozilla link.

How to get troubleshooting information
Firefox provides a way to see an extensive collection of information about your browser setup and configuration that can be helpful If you have problems. To access the troubleshooting information page, open the fly-out Help menu and click “Troubleshooting Information”.
Another way to open Troubleshooting Information is to enter “about:support” (without quotes) in the Firefox address bar.
Find your profile folder
Firefox stores critical information about the browser and its configuration in a location called the “Profile Folder”. If you ever need to go there, it isn’t so easy to find by the usual method. It has a long path and is a hidden folder but there are several quicker ways to get to it.
One way has been shown in a previous tip. The Troubleshooting Page discussed above contains an entry “Profile Directory” with a button “Open containing folder”.
Another way is to use the keyboard shortcut Winkey+R to open the Run box and then enter:
    %APPDATA%\Mozilla\Firefox\Profiles\
A description of the contents of the Profile folder is given at this Mozilla link. Keeping a backup copy of this folder is a good idea.

Twitter Delicious Facebook Digg Stumbleupon Favorites More